
 EN
EN
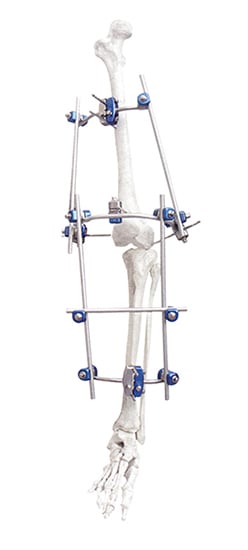
Proper adjustment of an external fixator after surgery is critical to ensure successful bone healing and patient recovery. The external fixator is a temporary stabilization device that holds fractured or surgically repositioned bones in alignment while they heal. Understanding how to adjust external fixator systems correctly prevents complications, maintains optimal alignment, and promotes the best possible functional outcomes. This guide explains the essential techniques and considerations for adjusting your external fixator during the post-operative period
Adjusting an external fixator after surgery requires a systematic approach that balances precision with patient safety. Your surgical team has positioned the external fixator to maintain specific alignment angles and distances determined during your operation. Any adjustments to the external fixator must follow clinical protocols to avoid disrupting bone healing or causing soft tissue damage. Learning the correct adjustment process ensures you can maintain the device properly throughout your recovery.
Understanding External Fixator Adjustment Principles
The Role of Precision in Post-Operative Care
The external fixator maintains bone fragments in their correct anatomical position during the critical early healing phase. When surgeons recommend adjusting the external fixator, these modifications are calculated to guide bone healing as the fracture progresses through different stages. The external fixator can be fine-tuned using telescoping rods, hinges, or threaded connections that allow millimeter-level adjustments. These precision adjustments help correct any minor misalignments that may have developed and support progressive weight-bearing protocols as healing advances.
Timing and Clinical Indications
Adjustments to your external fixator typically begin within the first two to three weeks after surgery, once initial swelling has reduced and early callus formation is visible on imaging. Your surgeon will order radiographs to assess alignment and determine whether adjusting the external fixator is necessary. Common reasons for adjusting the external fixator include correcting rotational errors, addressing length discrepancies, or modifying angulation. The decision to adjust the external fixator is made based on clinical examination, imaging findings, and your tolerance to progression. Never attempt to adjust the external fixator without explicit instructions from your surgical team.
Safe Adjustment Procedures for External Fixator Maintenance
Pre-Adjustment Preparation and Safety Measures
Before adjusting the external fixator, ensure your hands are clean and the device is inspected for any loose connections, corrosion, or pin site infections. Pin sites should be cleaned regularly with sterile saline and inspected for signs of inflammation or drainage. If infection is present, alert your physician immediately before attempting to adjust the external fixator. Pain management is important during adjustment, and your surgeon may recommend pain relief strategies or scheduling adjustments at optimal times. Always work in a well-lit area and use only the tools specified by your surgical team when adjusting the external fixator.
Step-by-Step Adjustment Techniques
To adjust the external fixator correctly, identify which rods or joints require modification based on your surgeon's instructions. For telescoping rods, loosen the locking mechanism slightly, make small incremental turns, and re-secure firmly after each adjustment. When adjusting the external fixator for length changes, move in small increments—typically one to two millimeters per adjustment—to avoid sudden stress on healing bone. Hinged joints on your external fixator allow angular adjustments; these should be modified gradually over multiple sessions rather than in single large movements. After adjusting the external fixator, verify that all connections are tight and the device feels stable. Take a test step or move the limb gently to confirm the adjustment feels secure before resuming normal activity.
Monitoring and Optimizing External Fixator Function
Post-Adjustment Assessment and Imaging
After you adjust the external fixator, your surgeon will typically order follow-up radiographs to confirm that the new position maintains proper alignment. These images verify that adjusting the external fixator achieved the intended correction without introducing new problems. Regular imaging allows your surgical team to track bone healing progress and determine if additional adjustments to the external fixator are needed. Never rely on how the external fixator feels subjectively; radiographic confirmation is essential because early bone healing may not be apparent without imaging. Document the date and details of each adjustment to track your external fixator's adjustments throughout your recovery journey.
Progressive Loading and Device Modifications
As bone healing progresses, your surgeon may recommend modifications to how you use your external fixator, such as gradually increasing weight-bearing or reducing dynamic support. Some patients benefit from adjusting the external fixator's tension or compression settings to promote bone formation. These progressive adjustments to the external fixator support the transition from early healing to bridging callus formation. Flexibility and hinged designs in modern external fixator systems allow greater functional freedom compared to rigid frames. Your compliance with the prescribed adjustment schedule and loading protocols significantly influences how quickly you can transition out of the external fixator and resume full function.
Common Complications and Prevention Strategies
Recognizing Problems Requiring Medical Attention
Pain that increases after you adjust the external fixator, swelling that worsens, or new neurological symptoms indicate potential complications requiring immediate physician consultation. Pin site infections remain the most common complication associated with external fixator use; signs include increased drainage, warmth, or redness around pin insertion sites. If the external fixator becomes loose or feels unstable despite appearing properly tightened, contact your surgical team before resuming weight-bearing activities. Bone segment drift—where the bone shifts from its correct position—may occur and necessitate readjustment of the external fixator. Early detection of these issues prevents prolonged complications and ensures your external fixator continues supporting optimal healing.
FAQ
How often should I adjust my external fixator after surgery?
The frequency of adjustments varies based on individual healing patterns and surgical goals. Initial adjustments to the external fixator typically occur within the first few weeks post-surgery. After the initial phase, your surgeon may prescribe adjustments every one to two weeks during the active distraction or correction period. Some patients require monthly adjustments as healing progresses, while others need minimal changes once optimal alignment is achieved. Always follow your surgeon's specific timeline for adjusting the external fixator rather than making self-directed changes.
What tools do I need to safely adjust my external fixator?
Your surgical team will provide specific tools designed for adjusting your particular external fixator model. Standard adjustment tools include hex keys, ratchet handles, or torque wrenches that fit the connecting joints and telescoping mechanisms. Using improper tools when adjusting the external fixator risks stripping threads, damaging the frame, or applying incorrect force that disrupts bone alignment. Store tools in a clean, dry location and inspect them for damage before each use. Request replacement tools from your surgeon's office if any become bent, corroded, or defective.
Can I shower with my external fixator in place?
Yes, you can typically shower with your external fixator, but protection of pin sites is essential to prevent infection. Cover the pin sites with sterile gauze and waterproof tape before showering, or use a specialized waterproof external fixator cover if recommended by your surgeon. After showering, immediately remove the protective covering and allow pin sites to air dry, then perform your regular cleaning routine. Avoid soaking the external fixator in water for extended periods or submerging it completely in baths. Keeping your external fixator dry and maintaining strict pin site hygiene reduces infection risk during the entire adjustment and healing process.